In this tutorial,i will show you how to add a wooden effects to a text.For this effect we need two support images.I provide the links for those two support images.Lets see the tutorials..
Support Files:
Wooden Surface
Wooden Background
Step1:
Create a new document in Photoshop with the following settings:

Step2:
Double click on the background layer and hit OK to unlock it. Now right-click on the same layer and select Blending Options. Here we will add a radial gradient going from a light grey to a darker one:

Step3:
Grab the Rounder Rectangle tool, set 40 px for the radius and create a polygon. The color is not important at this stage since we will apply layer styles later.

Step4:
Right-click on the layer and select Blending Options. At first let’s switch the color overlay to brown.

then apply bevel and emboss with these settings and select soft drop shadow.


Step5:
Press ctrl+T to activate the transform tool and rotate a bit the polygon. Then press enter to apply the transformation.

Step6:
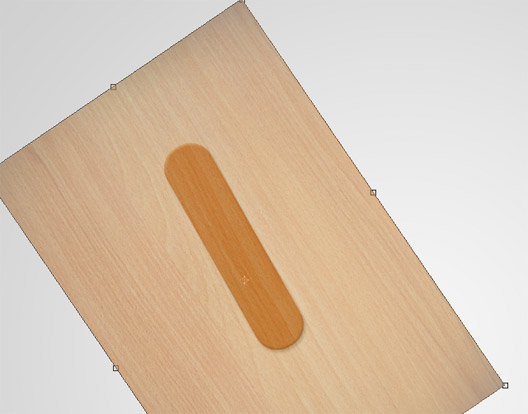
Paste in the Wooden Surface Texture and place it in a layer above the polygon’ s one. Rotate the texture too. In the screenshot below I reduced the wood opacity to show you the polygon position.

Step7:
With the wooden texture selected, ctrl+click on the polygon vector mask to select its pixels. Then press the “add layer mask” button at the bottom of the layers window. The screenshot below will help you understand better this step.

Step8:
Select the wooden texture layer and switch the layer blending mode to soft light. This will make visible layer effects we applied to the polygon. Then apply the sharpen filter (Filter>Sharpen>Sharpen) to enhance wood details.

Step9:
Repeat the same process to create another stick. The only difference is the polygon color overlay, that is a lighter brown (#d5864d)
Step10:
At this point open the Wooden background in Photoshop. With the elliptical marque tool make a selection of the nail head.

Step11:
Copy (ctrl+C) and paste (ctrl+V) the selection into our main canvas and place it into the intersection between the 2 sticks.

Step12:
Press shift+ctrl+U to desaturate the nail. Then apply a pillow emboss to create the engraved effect.

That's all. You can write any alphabet using this technique and arrange them in a sequence to form a text.
Support Files:
Wooden Surface
Wooden Background
Step1:
Create a new document in Photoshop with the following settings:

Step2:
Double click on the background layer and hit OK to unlock it. Now right-click on the same layer and select Blending Options. Here we will add a radial gradient going from a light grey to a darker one:

Step3:
Grab the Rounder Rectangle tool, set 40 px for the radius and create a polygon. The color is not important at this stage since we will apply layer styles later.

Step4:
Right-click on the layer and select Blending Options. At first let’s switch the color overlay to brown.

then apply bevel and emboss with these settings and select soft drop shadow.


Step5:
Press ctrl+T to activate the transform tool and rotate a bit the polygon. Then press enter to apply the transformation.

Step6:
Paste in the Wooden Surface Texture and place it in a layer above the polygon’ s one. Rotate the texture too. In the screenshot below I reduced the wood opacity to show you the polygon position.
Step7:
With the wooden texture selected, ctrl+click on the polygon vector mask to select its pixels. Then press the “add layer mask” button at the bottom of the layers window. The screenshot below will help you understand better this step.

Step8:
Select the wooden texture layer and switch the layer blending mode to soft light. This will make visible layer effects we applied to the polygon. Then apply the sharpen filter (Filter>Sharpen>Sharpen) to enhance wood details.

Step9:
Repeat the same process to create another stick. The only difference is the polygon color overlay, that is a lighter brown (#d5864d)
Step10:
At this point open the Wooden background in Photoshop. With the elliptical marque tool make a selection of the nail head.

Step11:
Copy (ctrl+C) and paste (ctrl+V) the selection into our main canvas and place it into the intersection between the 2 sticks.

Step12:
Press shift+ctrl+U to desaturate the nail. Then apply a pillow emboss to create the engraved effect.

That's all. You can write any alphabet using this technique and arrange them in a sequence to form a text.
(Source:wegraphics.net)
No comments:
Post a Comment